- Home
- Genomes
- Genome Browser
- Tools
- Mirrors
- Downloads
- My Data
- Projects
- Help
- About Us
Contents
Introduction
Getting Started
- Create a new collection
- Add tracks to a collection
- Browser viewing options
- Configure collection
- Saving and sharing collections
Resources and Support
Introduction
The Track Collection Builder (My Data > Track Collection Builder) is a tool that allows multiple tracks to be copied and grouped together into one composite track or "collection." A composite track can be thought of as a container for grouping a set of similar-type annotation tracks.
Quick video demo
 Visit our Video Page.
Visit our YouTube channel for more videos.
Supported Data Types
Only the following continuous-value graphing track types can be added to a collection:
Track Sources
Supported tracks from the following sources can be added to a single genome browser:
- Native tracks (tracks natively hosted by the UCSC Genome Browser).
- Custom tracks (user-generated).
- Hub tracks from your own unlisted hub.
- Hub tracks from any public hub.
Getting Started
Step 1: Create a new collection
The "Collected Tracks" top right pane displays all created collections.
- Click the button to make a new collection.
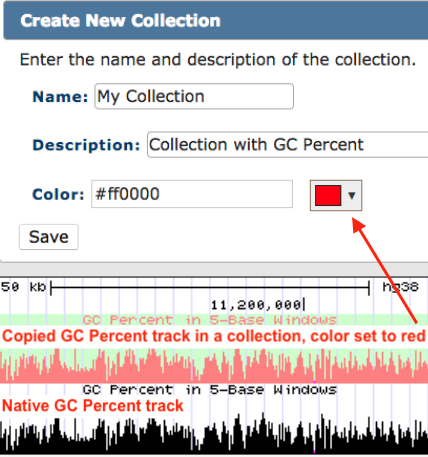
- On creation, enter a name, description and optional graph color in the pop-up box.
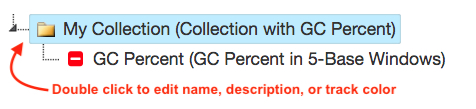
- Once saved, double-click a collection's folder icon to edit the name, description, and subtrack colors.
- See 'Step 2' below to add/remove tracks.
- To remove a collection: select it, right-click (or select multiple, 'command + click', 'shift + click') and click .
- Collection changes are saved after going to the browser window. To remove changes since the last save, click (upper right).
- Click (upper right) to see collections in the browser.
- From the browser, right-click to configure the collection (see 'Step 3' below).
Step 2: Add tracks to a collection
The 'Available Tracks' top left pane displays all available graphing tracks that can be added to any collection.
- Available Tracks (left window pane)
- Click the small arrow to the left of folder icons to expand/contract tracks.
- 'Visible Tracks' folder: Lists tracks that are visible (not set to 'hide') in the browser.
- Folders below 'Visible Tracks': Lists all available tracks, regardless of visibility, by browser category.
- Load external tracks: custom tracks & hub tracks
- Load supported custom tracks into the browser and select them from the 'Available Tracks' pane.
- To add a track from a hub, load the hub first, and then select the track from 'Available Tracks'. Collections must contain subtracks that all belong to the same assembly.
- Add & remove tracks
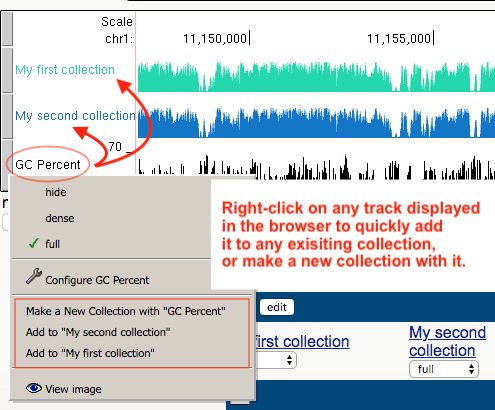
- To add a track to a collection, click the green "plus" symbol to the left of each track, or right-click (or select multiple, 'command + click', 'shift + click') and .
- To remove a track from a collection, click the red "minus" symbol to the left of each track, or right-click and .
- A single track can be added/duplicated multiple times into a single collection.
- A single track can be added to multiple collections, where various comparison views can be applied (see 'Step 4' below).
- Drag and drop to reorder tracks within a collection.
- To add tracks directly from the browser, right click on the track to see options.
Step 3: Browser viewing options
When viewing collections within the browser, the following viewing options are available:
- Re-order collections within the browser
- Sorting by similarity
- Sorting by magnitude
Drag and drop collections (composite tracks) within the browser to rearrange the order in which they appear in the browser.
To sort by similarity, right-click the collection in the browser window and select . For the given region visible in the browser window, tracks within the collection will sort in order of similarity. Sorting by similarity counts the number of pixels set in each column and then uses matrices to build a neighbor joined tree, which then has its leaves sorted to make an optimal ordering. The source of the optimal leaf sorting algorithm is credited below.
To sort by magnitude, right-click the collection in the browser window and select . For the given region visible in the browser window, tracks within the collection will sort in order of magnitude, with the highest in magnitude at the top of the subtracks in the collection where magnitude reflects the total number of pixels set when drawing each track.
Tip: Displaying collection names in the browser:
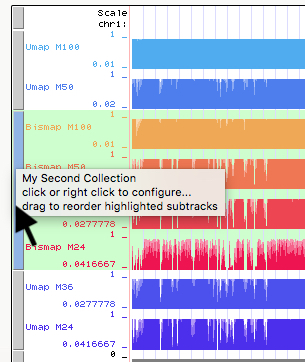
Once a collection has been created and tracks have been added to it, click (upper right) to view the collection in the browser window. In the browser, mouse-over the gray vertical buttons at the left window frame to see the name of each collection.
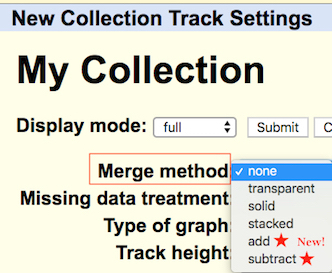
Step 4: Configure collection
- Track Color:
- Merge methods (aggregate/overlay graphing view options):
- None
- Default setting; no overlay/merge is applied. Subtracks appear as individual tracks within the collection/composite.
- Transparent
- Subtrack graphs are merged together with transparent overlay views.
- Solid
- Subtrack graphs are merged together with solid overlay views.
- Stacked
- Subtrack graphs are layered horizontally with solid overlay views for each subtrack.
- Add
- Subtrack graphs are layered horizontally and merged into one solid overlay color; the silhouette of 'stacked.' For this 'add' view, there is also the option to configure how missing data are treated (see section below).
- Subtract
- The first (top) subtrack is subtracted from the sum of the others. Note: Re-order collection subtracks in the 'Collected Tracks' pane to change which subtract is at the top. For this 'subtract' view, there is also the option to configure how missing data are treated (see section below).
- Missing data treatment:
- Missing=0
- Default setting. Missing data are replaced with a 0 (zero). Graphing will be drawn at the
zero point for the x-axis and y-axis (0,0).
Note: Calculations (where 'Merge Method' = 'Add' or 'Subtract') will use a zero in the arithmetic. - Missing=missing
- Graphing will not be drawn for missing data points. Where data are missing for any point in the calculation, the calculated result for that position point will be missing.
Track color for all subtracks in a collection can be set by double-clicking the collection folder in the right window of the Track Collection Builder, which will display a pop-up dialog box. In the pop-up, a color can be set for the subtracks in the collection. Color will be applied as a gradient to subtracks in the collection (e.g., if red is selected, the subtrack graphs will appear in varied shades of red within the browser window).
To revert back to the original track color, change the color picker to '#000000'. To change the track color to black rather than any non-black original color, set the color picker to any shade of black besides '#000000', such as '#000001'. For example, if a track's original color is green, you can change it to red with the color picker. To change this track back to the original color (green), set the color picker to '#000000'. If you instead want to change that track to black, select any shade of black in the color picker, such as '#000001'.
Tracks in collections can be displayed with multiWig aggregate/overlay "merge" methods (stacked, transparent, etc.) as well as new add & subtract options.
Step 5: Saving and sharing collections
Collections will be available 48 hours before expiring. You must save your session to preserve collections long-term and to allow sharing. Even after saving collections and their configurations in a session, it is still highly recommended to keep local back-ups of your session contents and any associated custom tracks.
Resources & Support
- Questions? Contact us!
- Learn more about composite tracks: Quick Start Guide to Hubs & Hub Track Database Definition guide.
- Credit to Dr. Bar-Joseph for assisting with wiggle sorting development: Bar-Joseph Z, Demaine ED, Gifford DK, Srebro N, Hamel AM, Jaakkola TS. K-ary clustering with optimal leaf ordering for gene expression data. Bioinformatics. 2003 Jun 12;19(9):1070-8. PMID: 12801867